
Creating a local user account in Windows 11 is a simple yet practical way to keep your personal settings secure when sharing your devices.
From my experience assisting Windows users with setting up their systems, I’ve found that creating different accounts can make the process smoother and more accessible for everyone.
This guide will walk you through the steps to create a local user account, ensuring that your preferences and data stay safe whenever you lend out your computer.
Quick Facts
Time Required: 5-10 minutes
Difficulty Level: Beginner to Intermediate
️ Windows Versions: Windows 11
Requirements: Administrative Access
Prerequisites
Before we begin:
Windows Version: Windows 11
️ Required Access: Administrator
️ Backup Recommended: Yes, to ensure you can revert changes if needed
I recommend logging in with an admin account before starting to ensure you have the necessary permissions.
Method 1: Using the Settings App (Recommended for Most Users)
The Settings app is the easiest and most straightforward method for most people.
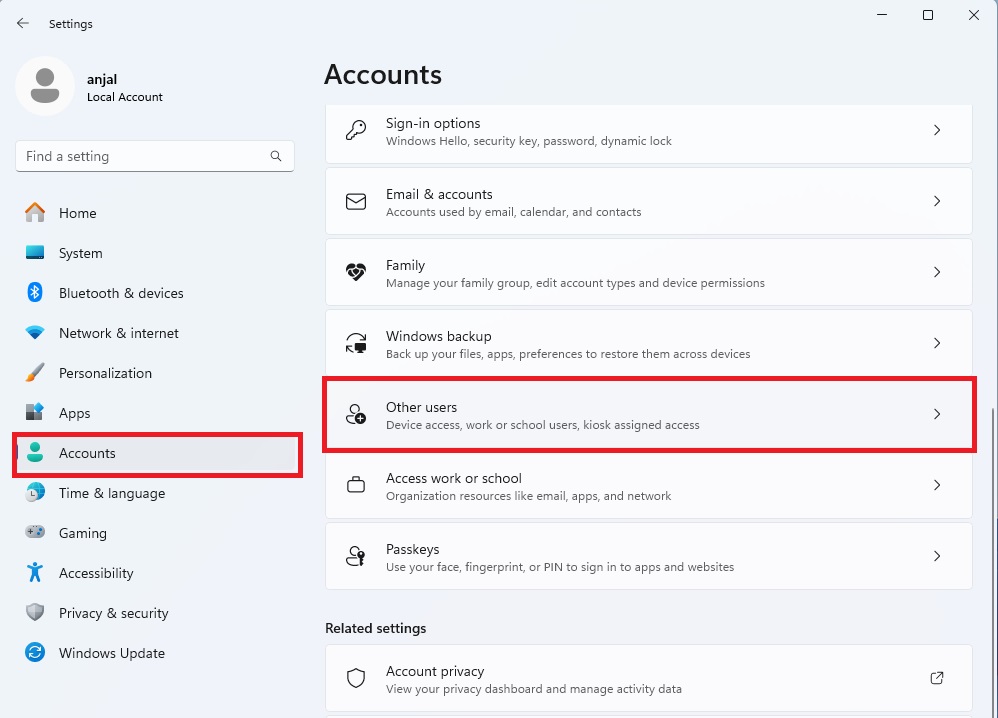
- Open Settings
Press Windows + i to open the Settings app. Then select Accounts from the left menu and choose Other Users on the right.
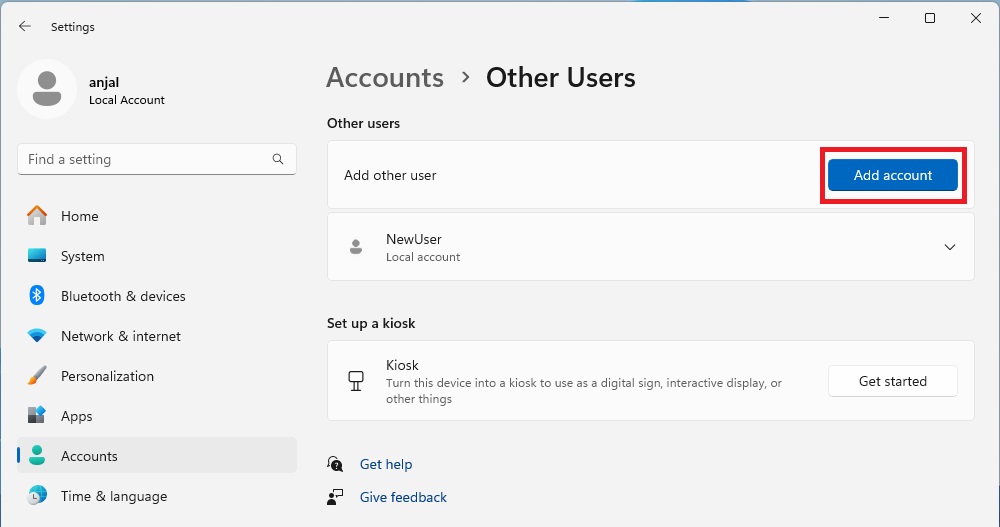
- Add a New Account
Click Add Account under the “Other Users” section.
Select I Don’t Have This Person’s Sign-In Information.
Click Add a User Without a Microsoft Account.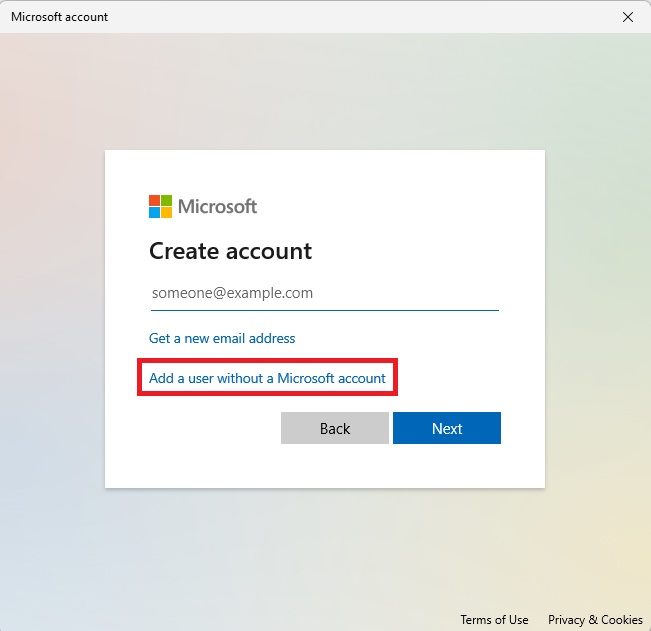
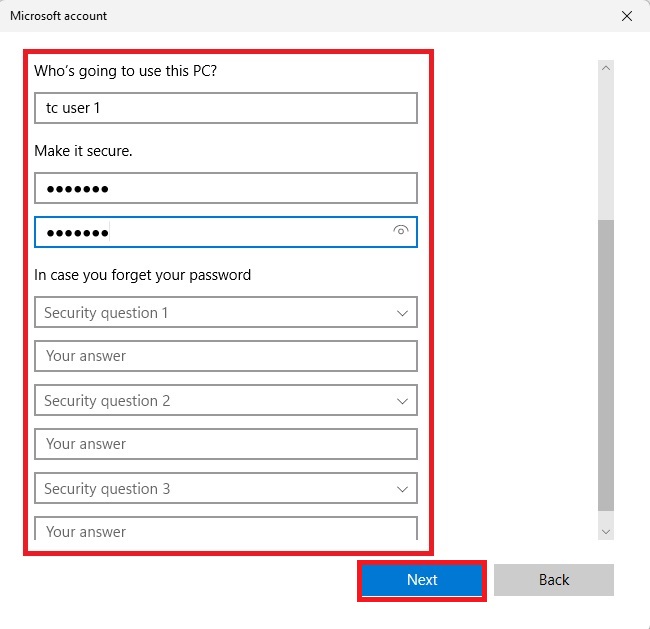
- Enter User Details
Enter a username, create a password, and provide answers to security questions to help recover the account if needed. Click Next to finish.
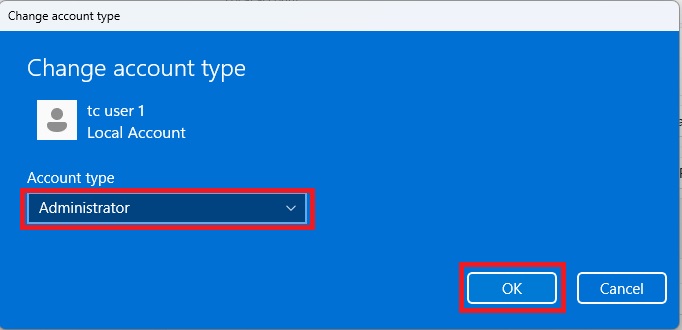
- Change Account Type (Optional)
By default, the new account will be a standard user. To make it an administrator, click the account under Other Users, select Change Account Type, and choose Administrator.
Method 2: Using Command Prompt
If you prefer a more hands on approach, you can create a local user account using Command Prompt.
- Open Command Prompt
Press Windows + S, type “Command Prompt,” then right-click and select “Run as Administrator.” Click “Yes” if a prompt appears.
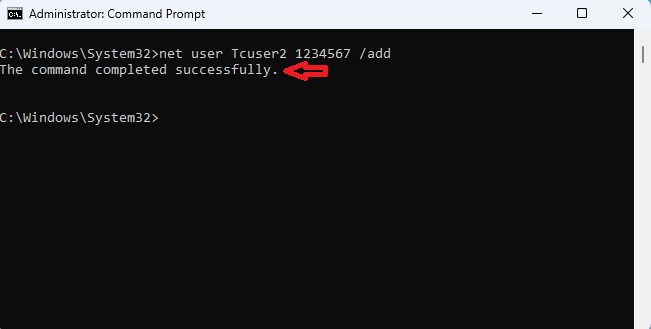
- Create a New User
Type the following command, replacing NewUser and NewPassword with your desired username and password:net user NewUser NewPassword /add
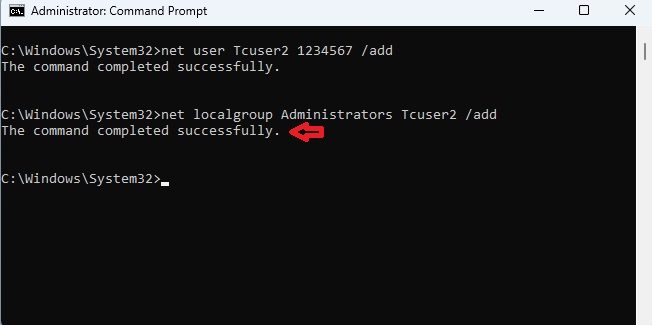
- Make the Account an Administrator (Optional)
To make this new account an admin, run:net localgroup Administrators NewUser /add
Method 3: Using PowerShell
PowerShell offers another way to create a local user account, similar to Command Prompt.
- Open PowerShell
Press Windows + S, type “PowerShell,” and select Run as Administrator. Click Yes when prompted.
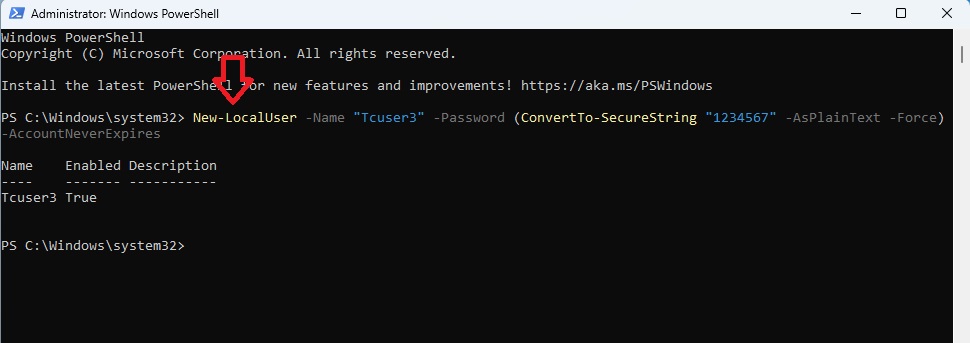
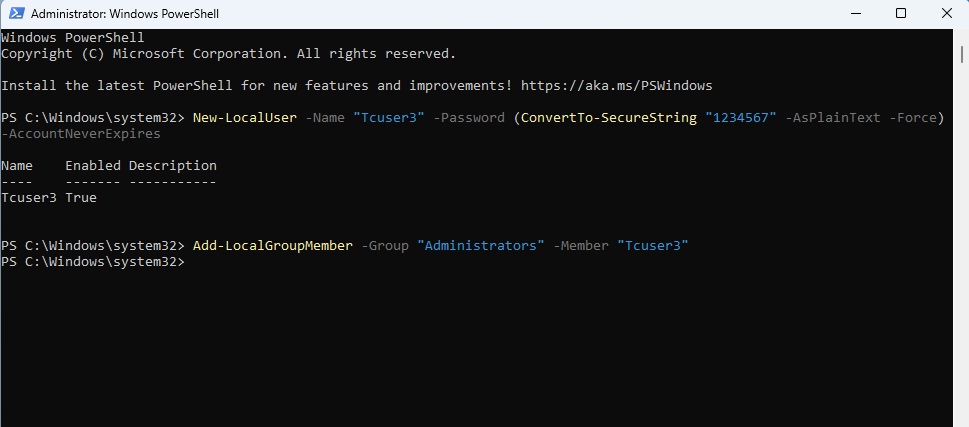
- Create a New User
Run the following command, replacing NewUser and NewPassword with the appropriate details:New-LocalUser -Name "NewUser" -Password (ConvertTo-SecureString "NewPassword" -AsPlainText -Force) -AccountNeverExpires
- Make the Account an Administrator (Optional)
To grant admin rights, use:Add-LocalGroupMember -Group "Administrators" -Member "NewUser"
Method 4: Using Computer Management (Windows 11 Pro)
For those using Windows 11 Pro, the Computer Management utility provides a graphical interface for managing users.
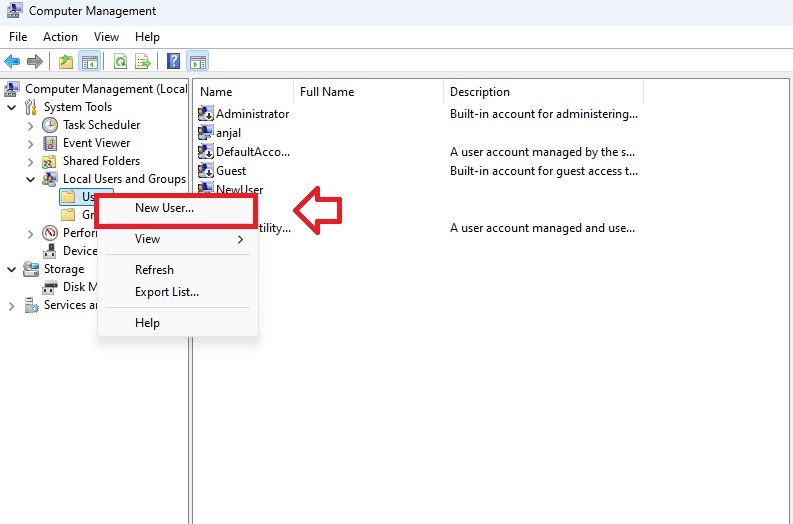
- Open Computer Management
Press Windows + S, type “Computer Management,” and select the app. - Navigate to Users
Go to System Tools > Local Users and Groups > Users. Right-click in the right pane and select New User.
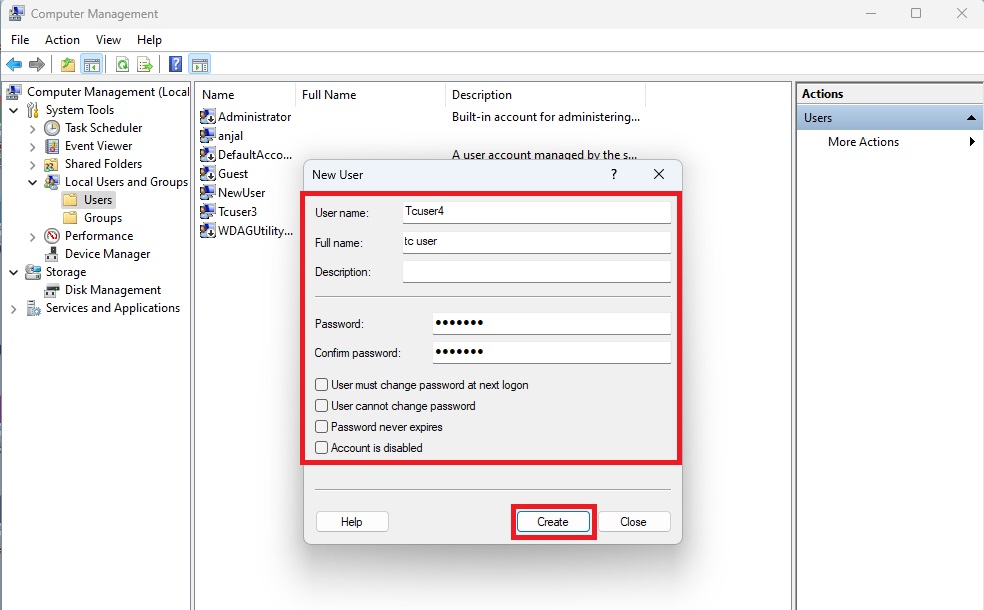
- Fill in User Details
Enter a username, password, and other details, then click Create.
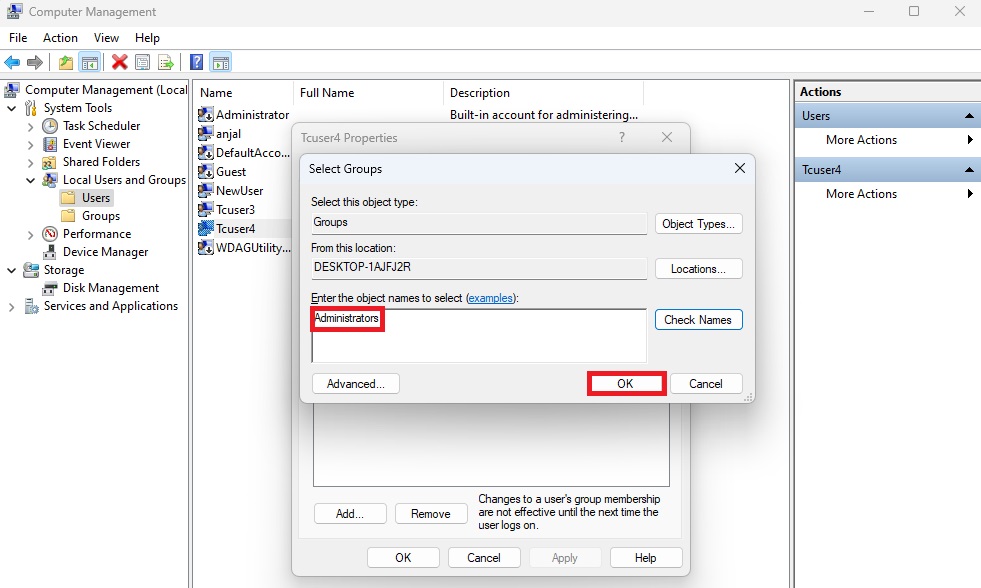
- Make Administrator: To make this account an admin, right-click the account, select Properties, go to the Member Of tab, and add it to the Administrators group.

Method 5: Using Netplwiz
The Network Places Wizard offers an alternative method to create a new user on Windows 11.
- Open Netplwiz
Press Windows + R, type netplwiz, and hit Enter. - Add a New User
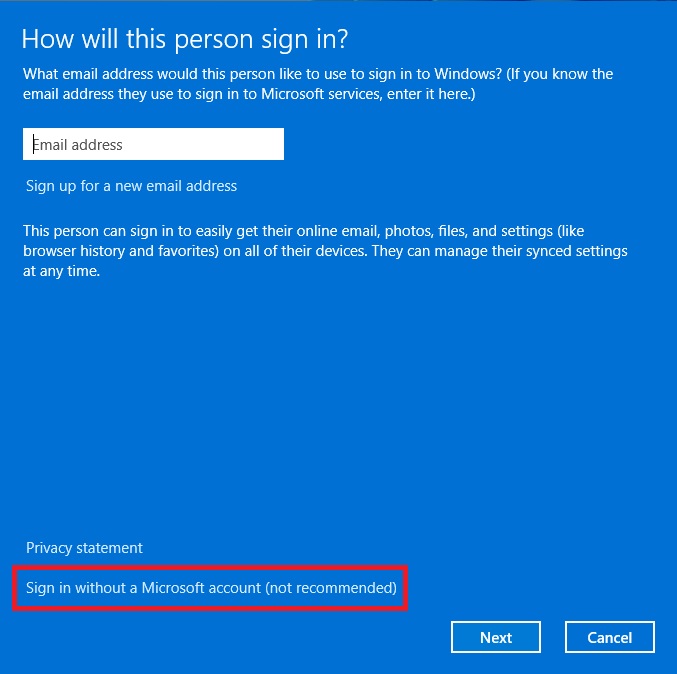
Click Add and select Sign In Without a Microsoft Account (Not Recommended).
Then choose Local Account.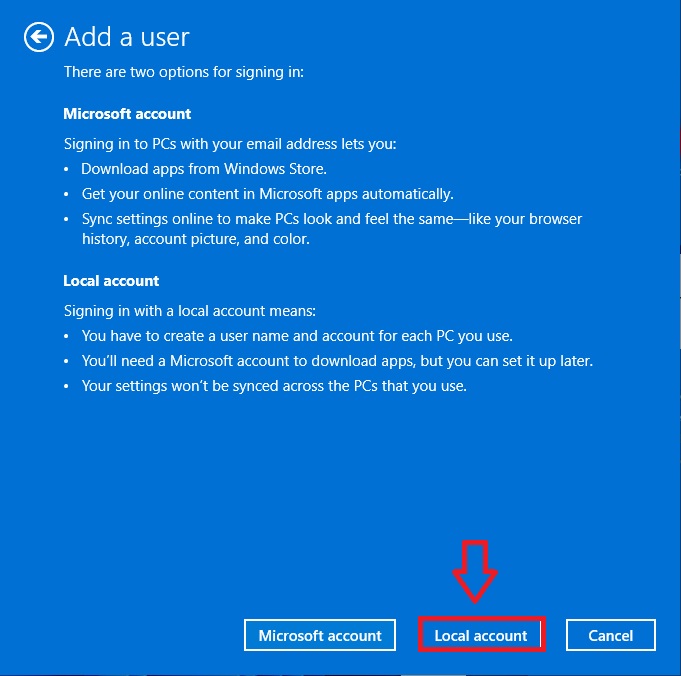
- Enter User Details
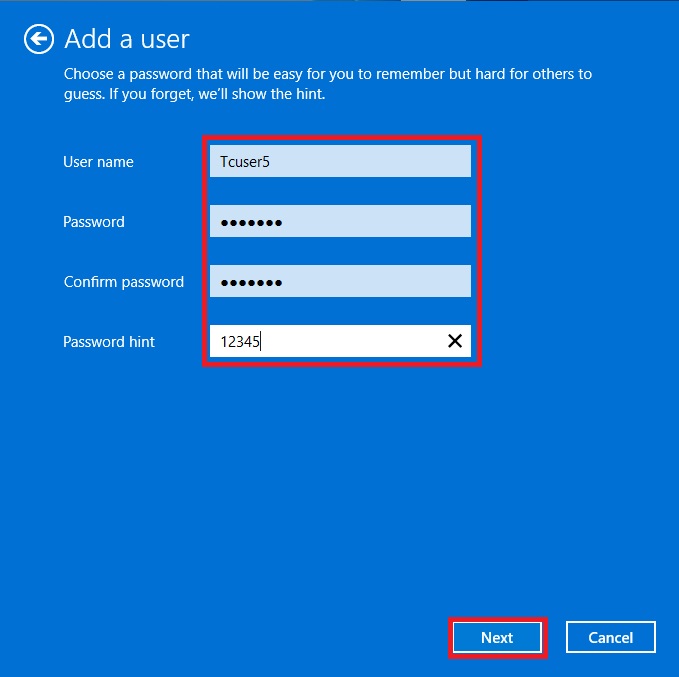
Enter a username, password, and password hint, then click Next and Finish.
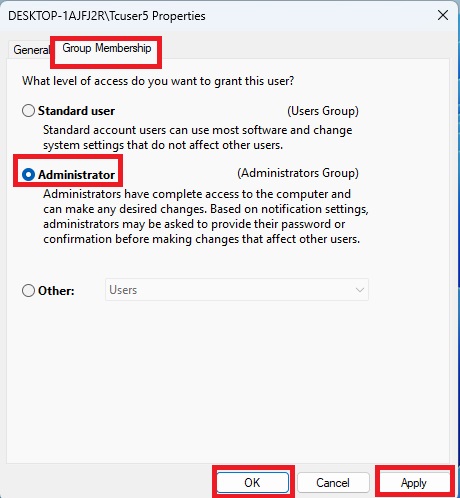
- Make Administrator: To make the account an admin, select it, click “Properties,” go to “Group Membership,” pick “Administrator,” and then click “Apply” and “OK.”

Common Issues and Solutions
Here are the most common problems I’ve seen:
- Access Denied When Creating an Account
This typically happens if you don’t have administrative privileges. Make sure to run Command Prompt or PowerShell as an administrator.
- Can’t Find “Other Users” in Settings
Ensure you’re logged in with an admin account, as standard users can’t create new accounts.
Verification Steps
To verify that your new local user account was created successfully:
- Log Out and try logging in with the new account credentials.
- Check Account Type by navigating to Settings > Accounts > Other Users.
- Test Permissions if you made the account an admin by trying to install a program.
Final Tips
Here are my top recommendations:
- Use the Settings App if you’re unfamiliar with command line tools.
- Always Create a Password Hint to avoid being locked out.
- Double Check Account Permissions to ensure users have the correct level of access.
If you’re still having trouble, I recommend:
- Restarting Your Computer and trying again.
- Using a Different Method from the list above.
- Seeking Additional Help if you encounter persistent issues.
Updates and Maintenance
- Last tested: November 2024
- Windows versions verified: Windows 11