The recommended section on Windows 11 start menu shows all of your recent files and new apps. This section takes up almost half of the space on your start menu. So, you might want to remove it to create more space for your pinned apps.
However, the main caveat with this recommended section is that you can’t remove it in most Windows editions. You can only remove the recommended section in the Windows SE and Education editions.
For the rest of the Windows edition like Home, Pro, and Enterprise, you can’t remove the recommended section. You can only clear the contents of the recommended section, so it shows nothing, but the section still stays.
The only way you can actually remove this section in Home, Pro, or Enterprise editions is by using third-party apps or heavily tweaking your system.
Remove Recommended Section (SE & Education)
You can pretty easily remove the recommended section on Windows SE & Education by enabling the Remove Recommended Section From Start Menu policy in Group Policy Editor. Here’s how you can do so:
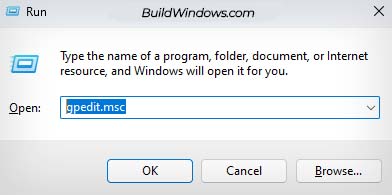
- Press Windows + R.
- Type
gpedit.msc, press Enter and open Group Policy Editor.
- Go to User Configuration > Administrative Templates > Start Menu and Taskbar.
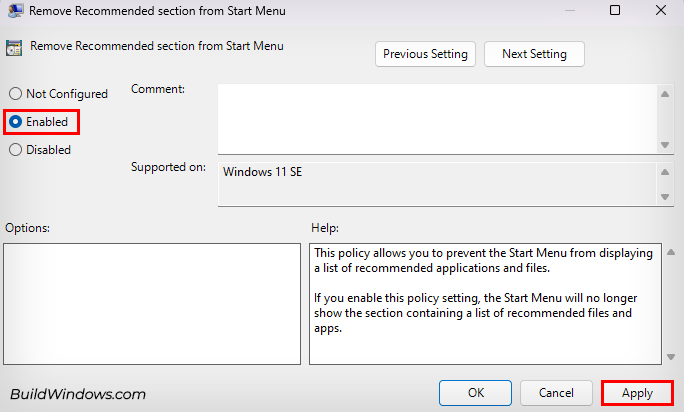
- Locate the Remove Recommended Section From Start Menu policy and double-click on it.

- Select Enabled and click on Apply.

- Close Group Policy Editor and restart your computer.

If you want the recommendation section back in your Windows 11, you can simply select Disabled or Not Configured in the Remove Recommended Section From Start Menu policy and click Apply.
Clear Recommended Section (Home, Pro, & Enterprise)
While you can’t remove the recommended section on Windows Home, Pro, or Enterprise Edition, you can clear its content to not show anything. So, let’s see how you can do so:
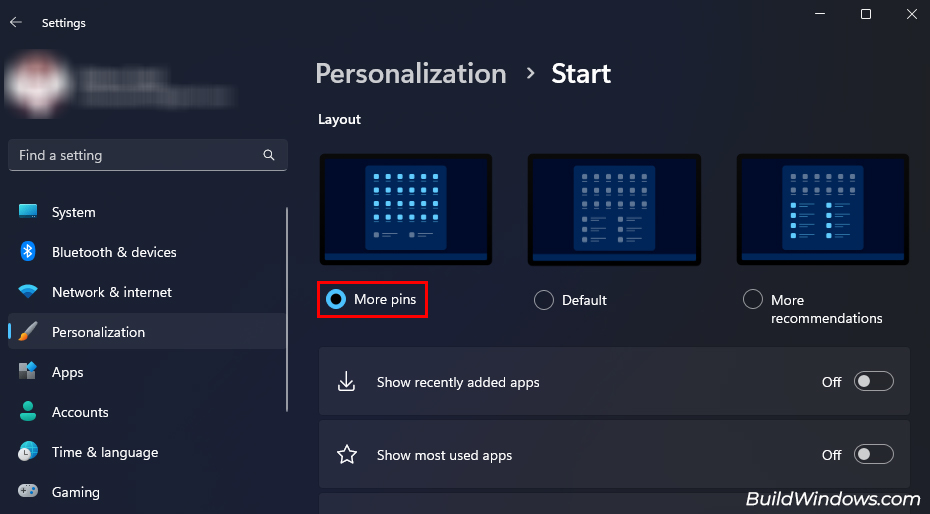
- Press Windows + I to open Settings.
- Navigate to Personalization > Start.
- Toggle off these three settings:
- Show recently added apps
- Show most used apps
- Show recently opened items in Start, Jump Lists, and File Explorer

- You should see the changes immediately.
- If you’re using Windows 11 22H2, you can also select More pins in the same window to minimize the space occupied by the recommendation section.


If you want the contents of your recommendation section back, simply toggle on the three disabled settings. Additionally, these steps also apply for Windows SE & Education edition if you want to clear the recommended section instead.
How to Remove Recommended Section in Windows Home, Pro, & Enterprise?
Microsoft doesn’t really allow you to remove the recommended section in Windows Home, Pro, or Enterprise Edition. While you might see a registry hack to remove the recommended section from sources online, they only work for the Windows SE and Education edition.
You can tweak your system to achieve this, but it is quite an extensive and complicated process. The other method you can utilize is to use third-party apps that remove the recommended section.
Caution: Using third-party apps may pose risks and security concerns
I personally use ExplorerPatcher, an open-source software, to remove the recommended section from my Windows Pro Edition. So, here’s how you can do so:
- Download the latest release of ExplorerPatcher from Github.
- Run the setup file to install it.
- After ExplorerPatcher runs, it might automatically change your taskbar to Windows 10.
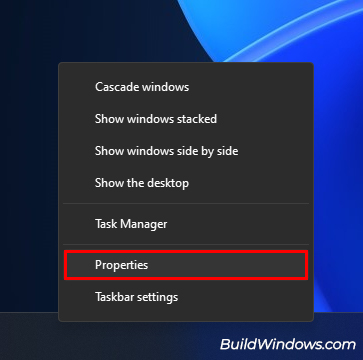
- Right-click on the taskbar and select Properties.

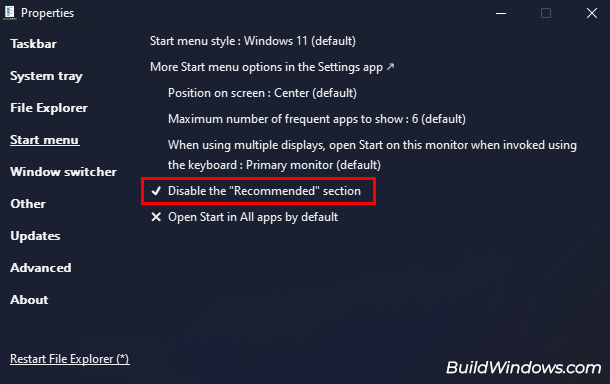
- Select Taskbar and make sure the Taskbar style is set to Windows 11(default).

- Go to Start menu and enable the Disable the “Recommended” section option.

- Click on Restart File Explorer at the bottom.